Free WordPress themes for download. Free bootstrap responsive WordPress HTML5 templates for your business. Collection of more than 10000 free WordPress themes. Download free parallax responsive WordPress themes including blogger, html, bootstrap, responsive html5 templates.
According to our recent WordPress Themes Survey, 85% of our customers customize their themes, and only 35% use a child theme when doing so. This may be due to a lack of understanding as to what a child theme is, or due to the perceived difficulty of creating one. In this tutorial, we will go over how to create and use child themes, and why using them is so important. (A special note for Elegant Themes customers only: If you are only looking to perform simple CSS changes to your theme, then you can use the Custom CSS box in ePanel instead of creating a child theme. For more in-depth changes that require editing php files, a child theme must be used.)
Why You Should Be Using Child Themes
Creating a child theme when performing adjustments to your theme’s code can save you a lot of future headache. Child themes allow you to make changes without affecting the original theme’s code, which makes it easy to update your parent theme without erasing your changes. By creating a child theme, you create a separate set of files that you can use to customize the theme without affecting the original theme at all. Not only does this make updating easier, it also makes sure that you will never ruin your original theme as you are never actually modifying the files. You can always turn off your child theme and fall back on the original.
Getting Started
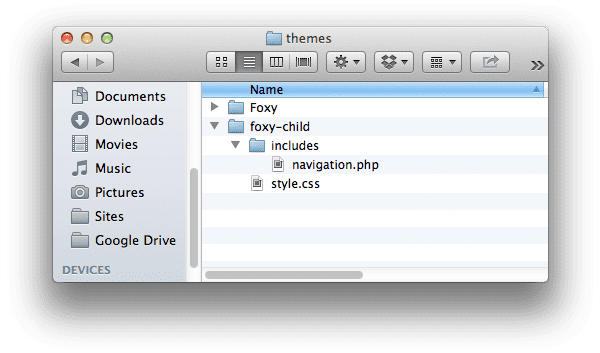
In this example, we will be creating a child theme for our Foxy theme. First things first, we need to create a new folder for your child theme. Naming it something like /foxy-child/ is conventional. Within your new theme folder, create a file called style.css and fill in the information as outlined below. The theme Name, URI, Description and Author are totally up to you.
The most important parts of this file are the “Template:” and @import sections, which identifies the parent theme imports the CSS from the original. You must ensure that the path to your parent theme’s css file is correct, and that the “Template:” parameter correctly identifies the name of your parent theme. If you are using a different theme, then adjust the values accordingly. Everything must be case sensitive! The folder of our parent theme is “Foxy” with a capital F, and the @import URL reflects this.
Activating Your Child Theme
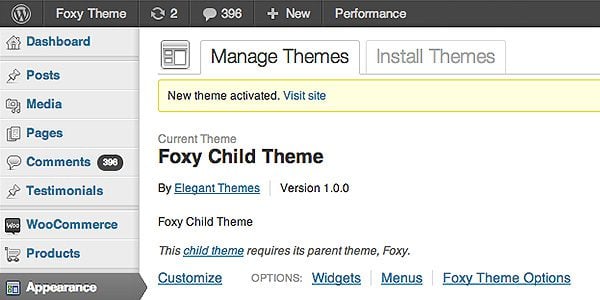
After you have created your child theme folder and style.css file, you can upload and activate your new child theme. Uploading and activating a child theme is no different than a normal theme, simply upload it via the Appearances > Themes page in your WordPress Dashboard and activate it. Before you upload it, you must first ZIP it. Macand Windows both have native ZIP functionality. Make sure that your parent theme is also uploaded (In the case of our example, the Foxy theme).
Modifying Your Theme’s CSS
We have now created our Foxy child theme and uploaded it. Because all we have done is import the original theme’s CSS, the theme will look exactly like the original. To modify your theme’s CSS, you can add any changes to your child theme’s CSS file below the @import line. All new CSS information is added after the original theme’s CSS is loaded. Because our new CSS is located below the original’s in the file, all new CSS styles will overwrite the original’s. For example, let’s say that we want to change the font weight of the “price tag” on our theme’s homepage. Right now it’s bold and gray, and we would like to make it thinner and green. We can add the relevant CSS to our foxy-child/style.css file as follows:
Once this change is added, the CSS in the child theme’s style.css file overwrites the original. In this case we get a nice green price tag as shown here:
Editing The Functions.php File
Functions.php is where a theme’s main functions are typically stored. A parent theme’s functions are always loaded with the child theme, but if you need to add more custom functions to your theme then you can do so by creating a new functions.php file within your child theme folder. The new functions will be loaded right before the parent theme’s functions. Your child theme’s functions.php file should start with a php opening tag and end with a php closing tag. In between, you can add your desired php code.
<?php
// Your php code goes here
?>
Editing Other Template Files
Beyond CSS and Functions modifications, you can also make structural changes to your theme by adjusting the php template files. This should be done with care, but by editing the PHP files you can adjust any part of the theme. Unlike editing the functions.php, where the original theme’s functions are imported automatically, PHP files are edited by replacing the file entirely with a new one. The theme’s original file is ignored and the new one is used instead. The first thing we need to do is replicate the old file before we start to modify it. To do this, simply copy and paste the theme’s original file into your child theme folder ensuring that the file name and location is exactly the same. For example, if we want to modify the theFoxy/includes/navigation.php, then we would copy and paste this file to foxy-child/includes/navigation.php.
WordPress knows to use this file in place of the old one because its name and location are the same. We can then open the file and make any necessary changes.
1. The One Click Child Theme Plugin – If you are having difficulty wrapping your head around the creation of the child theme folder, then this plugin will create one for you with the click of a button!
2. The WordPress Codex - There is all kinds of great documentation in theWordPress codex. If there is anything you need clarification on in this post, then this should be your first stop.
3. Child Theme Pros and Cons - For more information about the pros and cons of using Child Themes, WP Beginner has a great writeup.


0 comments:
Post a Comment